What spoken theatre expresses in two hours can be said by the mimic theatre in two minutes.
Marcel Marceau
Mime is the art of creating the illusion of reality.
Calude Kipnis[221]
The world and absent objects are created by positioning and moving the body and the hands. The audience must see, imagine and ‘fill in’. Here, mime refers to a technique of representing imaginary worlds (objects, characters, actions) by body techniques, and pantomime to represent words, mostly by hands and facial expressions.
According to Jacques Lecoq, everything that moves on stage is mime. Mime was very popular in the 1950s to 1970s, and was superseded in the 1980s by the precious Japanese butoh, which in turn has been superseded by ‘new circus’, which uses elements of mime. Today, mime itself is a marginal art or is integrated into other physical theatre styles.
Mime illusions are created according to three concepts:
- Gravity: To push and to pull, and the lever law
- Visuality: Wrist movements in manipulation
- Aesthetic considerations: ‘It must look good and balanced’: as an example: the rounded spine in some Decroux pushing exercises (‘La belle courbe’)
The elements of mime and illusion:
- The techniques consist of decomposition of movement, and moving body parts independently serving to simplify and clarify mimed action.
- To show subject as well as object (moving in front of a wall, the mimer must alternately show the person and the wall).
- To make imaginary objects visible by handling them precisely (manipulation).
- To show weight and counterweight, and their resistance, to make fictive actions (without real counterweight!) believable (pushing, pulling, lifting, digging, carrying, etc.).
- To condense time and space (to walk, run, swim, row, etc. on the same spot).
- Time and space are contracted or dilated. Film techniques are used for composition. (Strobe light; slow motion, replacements, shortenings, close-ups, long shots, overlapping, and cuts, etc.)
Creating illusions: manipulation techniques and fixpoint
Manipulation:
Handling fictive objects like boxes, a staff, round objects, very small and very big objects. The mimer’s body must submit the object he creates.
Manipulation exercises 3.76–3.83
Exercise 3.76: Warm up your wrists and fingers, circles around the wrist, painting the wall, hands inside-outside (see in the body education of level I).
Exercise 3.77: Standing in tree position, manipulating an imaginary rod (size of a relay staff).
Phases of picking and manipulating the rod:
- See the rod on the floor.
Bend down head, chest, arms and hands, bend the knees, present the open hands (with flexed wrists, but relaxed fingers) in front of the rod (with flexed wrist and extended fingers).
The fingers grip the object (but do not close into a full fist, showing the size of the stick), fingers downwards. - Rise
Hold the imaginary rod horizontally, fixpoint between the two hands. The distance between them stays the same, even when the rod is moved. Be aware of the straight line between the two hands.
Exercise 3.78: Manipulation drill: Stand in tree position, holding the imaginary rod in front of the body, both palms down, fixpoint between the hands and in a straight line.
- Open the right hand with an accent (‘toc’), lift and extend the fingers, right angle of wrist and arm to an accentuated beat.
- Relax the right hand, move it away in relaxed way to an unstressed beat.
- Present the open hand with an accent (‘toc’) again in front of the rod, fingers downwards and extended (with wrist and hand at right angles) to an accentuated beat.
- Close the fingers around the rod again to an unstressed beat.
- and 6. Move the rod vertically or horizontally (fixpoint between the hands) to unstressed beats.
Exercise 3.79: Practise manipulation of the imaginary rod with a rhythmic drill in medium, slow and quick tempo.
Exercise 3.80: Change vertical and horizontal handling of the rod. After each change of grip, turn the rod 90 degrees.
Exercise 3.81: Holding the rod with one hand only: If you retire one hand from the staff, the glance replaces the other end.
Exercise 3.82: The pole in the subway[222]: a vertical hand-rest pole. Hold the pole, walk around it, let go with one hand, hold higher up or lower down, stand up, sit down.
Exercise 3.83: Do the pole exercise with one or two partners.
Serial of manipulation exercises 3.84–3.102
Important: Maintain the object in your mind at all times!
Picking an apple, as introduced on level I exercise 1.304.
Exercise 3.84: Practise ‘Picking an apple’[223] with a metronome, at medium, slow, very slow and quick speed.
Exercise 3.85: Practise the apple exercise with concave or convex moment curves.
Exercise 3.86: Practise the apple exercise by accelerating.
Exercise 3.87: Practise the apple exercise by decelerating.
Exercise 3.88: Practise the apple exercise with a flourish.
Choose your basic body position for the handling of mimed object carefully. Straight objects need an ‘angular body with angular movements’, round objects require a rounder body. (The body always identifies with ‘positive’ objects! Handling a ball, the body can be somewhat rounded, whereas if you handle a needle, the body is straight, pointed.)
Exercise 3.89: Manipulate a small matchbox (angular!) and/or taking a cigarette from a pack. The body becomes angular as a matchbox and a cigarette pack.
Exercise 3.90: Handling, peeling and eating an orange (remember the colour, smell, surface, weight and taste of an orange). The body ‘becomes’ an orange.
Exercise 3.91: Work with partner(s), pass a box or another object to each other.
Exercise 3.92: Handle a tiny, shiny pearl, let it fall into the open hand, and react to the weight!
Exercise 3.93: Handle a ‘negative’ object. The body takes distance from it.
Exercise 3.94: Prepare breakfast (manipulate the objects, but smell, see and feel the objects. Improvisation.
Exercise 3.95: Handle a cube on the floor (1 x 1 x 1 m).
Exercise 3.96: A and B handle a cube together.
Exercise 3.97: Play with a fictive ball[224], throw it up, catch it and bounce it, etc. Add steps and dips and further small actions when the ball is in the air (clapping, turning round, etc).
Exercise 3.98: Do the exercise above in a rhythmic pattern (valse).
Exercise 3.99: A bored princess plays with a golden ball. Improvisation.
Exercise 3.100: Two princesses play with a little ball, two boys play football.
Exercise 3.101: The umbrella and the raincoat: While waiting for the bus, you’re holding a new raincoat and your umbrella. It starts raining. You want to put on the raincoat and open the umbrella. Improvisation.
Exercise 3.102: Dramatise Jacques Prévert’s poem[225]. Make a solo choreography out of it by carefully performing the action (representing A), giving the atmosphere of the poem. Compose a choreography of the poem with two people, ‘A and B’. Perform it, showing both persons, alternately.
Fixpoint exercises 3.103–3.108
Exercise 3.103: Swan; stick on. Group exercise. Move across all three floor levels: low, medium and high up. On the order of the instructor: ‘Swan, stick down the right elbow!’ (a toe, heel, foot, knee(s), buttocks, elbow(s), finger(s), shoulder, cheek, nose, ear, etc. become ‘stuck’ to the floor (as fixpoint), and the other body parts try to move away.) On the order: ‘Free!’ you move again freely. The exercise develops feelings and control of fixpoints.
Exercise 3.104: As per above, this time ‘sticking’ to a partner(s).
Exercise 3.105: Fixpoint in space of the head, a hand, a foot, etc. Keep the body part unmoved, and move the rest of the body away or come closer.
Exercise 3.106: Another fixpoint (isolation) pre-exercise: Look at your face in the mirror, isolate your head and rotate your body to the sides, move forwards and back, sideways right and left, walk in a circle, all without moving your head.
Exercise 3.107: Do the same with your hand: Stretch out your hand palm down, (a partner may hold his hand underneath, giving you control of movement), move away, and move again closer with your body.
Exercise 3.108: Isolations of various body parts. Isolate a foot, a shoulder, etc.
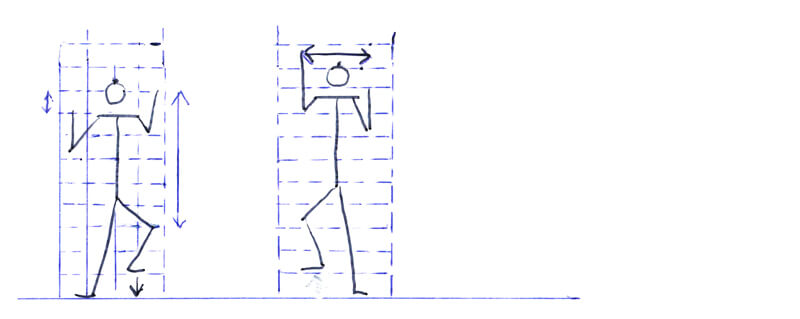
The fictive wall
Stand about 50 cm from a fictive wall. (Is the wall from stone, glass, or wood? Is there texture? Is it damp or dry? Clearing your imagination will help to create a wall spectators can see). Lift an arm (with a slightly raised elbow); with a fully relaxed hand (as if holding mashed potato in it), and quickly throw the hand flat against the wall (wrist absolutely at a right angle!) with the fingers spread and tensed. Now the hand represents the object, the wall, and the rest of the body is the person in front of it. If I wish to release my hand, I remove it by withdrawing the hand, and the angle of the wrist opens. The fingertips are the last part of the hand that leave the wall (‘Don’t take the wall with you!’).
Fictive wall exercises 3.109–3.117
Exercise 3.109: Feel the wall. Stand in the tree or Eiffel Tower position in front of your imaginary wall. Don’t move your legs. Feel its structure and temperature, and see its colours.
Exercise 3.110: Put your hand onto the fictive wall. Relax your right hand, (as if you had mashed potato in your hands), and place the hand with a quick and energic toc with extended fingers on the wall. (The root of the hand creates a right angle with the underarm).
Exercise 3.111: Remove the hand from the fictive wall. Remove the hand as per the previous exercise in a quick movement from the wall, by first leaving the root of the hand and at least the fingertips, and relax the hand. ‘Respect’ the wall you created. ‘Don’t go through it’. Also with the other hand, and with both hands at different levels of the wall, move up and down on the wall.
Exercise 3.112: Play with fixpoint between the hands. Put your palms with opened fingers (the hand at an angle of 90 degrees, symbolising the wall!) on an imaginary wall in front of you. Move the body in different ways away from the wall and come closer again, by keeping the hands at two fixpoints (the distance between the two hands, as well as the position of the hands in space).
Exercise 3.113: Release one hand, put it in another place related to your new position, then the other. Rule: When the hands move, the body stays as fixpoint.
To move along the fictive wall
Exercise 3.114: 1. Move the body. Put the hands on the wall and keep them as fixpoint, move only the body to the right side, cross the left leg over the right leg (with open hips!) and move the right leg to the right again). The hands stay in place!
Exercise 3.115: Move the hands. Lift the outer hand from the wall, cross it over the other hand to the right on the wall, lift the other hand and move it to the right, etc. (Also practise to the left side). The body stays in place!
Peeping round a corner[226]
Exercise 3.116: The edge of the wall.
- The hands reach the edge of the wall on the right side. The hands turn round the corner, and hold the edge, right hand at chest hight and left hand over it (The hands shoulder-hight, both palms inside, creating with the wrist an angle of 90 degrees).
- The left foot crosses in front of the right foot, the left leg is bent,
- the right leg extends sideways (hip and leg pass the edge, fixpoints of the hands in between the hands and fixpoint in space, in relationship to the moving body.
- Bending the right leg and extending the left leg.), move the body to the left. The upper body and the head ‘look’ now around the corner.
Exercise 3.117: To explore a dark prison (Famous exercise of Marcel Marceau): Move along the wall, the corners, and finally find a door for escape. Improvisation.
The fictive table (horizontal fixpoint) exercises 3.118–3.124
Exercise 3.118: Imagine a specific table. See it in front of you. Realize its size, colour, texture. Touch the table.
Exercise 3.119: The table. ‘Throw potato-smash-hands’ one after the other on a fictive table, fixpoint. When a hand leaves from the table (the fingertips leave the last), make sure ‘not to take the table with you’ and to let the other hand stay in fixpoint. Make a clear distinction between the table (hand extended, tensed) and your own hand (relaxed), between object and subject. Walk around the table. (Work with inner images: what kind of table do you touch?) Relax your hand and fingers. Smash your right hand with a very short accent flat on your imaginary table in front of you. Retire the hand, finger-tops leave last from the table, relax the hand.
Exercise 3.120: To pick a needle from the floor. Relax your hand and fingers. Put your right hand on an imaginary table on your right side, bend down to the floor, keep your left hand in fixpoint (the wrist bent, a 90 degrees angle to the hand). The table is still there, even when you do not look at it for the moment! See a needle on the floor and pick it up, look up to the table, put the needle on the table and rise (your right hand, symbolising the table, must absolutely stay on the same spot).
Exercise 3.121: Practise the needle-exercise with a partner standing beside you, putting his hand in the same hight as your table for the control of your fixpoint.
Exercise 3.122: Walking along or around a table, move hands horizontally. Always taking steps with hands point fixe, standing still when moving your hands.
Exercise 3.123: Dinner. Sitting at a table, drinking, eating with imaginary objects. Do not show only the technical side, but also see and feel the glass, the drink, the food. Improvisation.
Exercise 3.124: Boat trip. You are the helmsman on an old-fashioned boat at the steering wheel. Improvisation.
To open and close a door exercises 3.125–3.127
Exercise 3.125: Open a door. Respect objects and space and use fixpoints.
Exercise 3.126: Open a door and pass with a coffee cup in your hand into the next room, close the door behind you. Simplify the results of the exercise above. The focus is on the action with the coffee cup, not on the door. Pass through the door with a specific aim/emotion.
Exercise 3.127: Learn the classical Chinese technique of opening a door[227] by drill.
Start in female position, right leg behind.
- (Inside a room). Hands on the door: first right, then left (Orchid hand, but angle of wrist and hand 90 degrees).
- Grip the latch (under the left hand) with the right hand, open it from left to right.
- Place both hands between the door wings (fingers front, palms outside, palms front, hands nearly touching), first right, then left.
- Left hand on left door wing, upper body leans back, right hand on right door wing, accent.
- Pull the door wing with the left hand towards the body, start pulling with right hand (the left side opens a little before the right side).
- Step left side back, step right back, push with right arm, free the hands.
- Lift the left foot, step over the threshold, arms free, lift the right foot (close along the left foot) over the threshold.
- Steps free (outside the room).
Stylise and reduce the action to a minimum: Create the door, hands in between the door wings, open the wings, step over the threshold, show you are outside.
Further improvisation themes for the manipulation of imaginary objects: exercises 3.128–3.129
Exercise 3.128: Find an object in a specific milieu (The theme can be given by the instructor): a diamond/a dirty handkerchief/a rare flower/a doll/an edible mushroom/a drug syringe, etc. and react. (To help the audience understand better: show the milieu, handle the object and react to it.)
Exercise 3.129: Find in a specific milieu: a bird fallen from a nest/a butterfly/an angry dog/catching a hen/bringing a cow into a stable/mounting a horse[228]. To help the audience understand better, you must show the animal, its energy and movements as well as the action with it.
To pull and to push
All human actions and locomotions consist of pushing and pulling. Weight, counterweight and gravity are at work. To recreate these actions in mime, the leverage law must also be remembered.
Difference between real action and mimed action:
The real push: From a fencing position, but it is the back leg that works most (counterweight!) The head moves forwards, the shoulders backwards, the pelvis forwards.
The mimed push: The front leg works most, but the illusion must be given that it is the back leg!
The necessary efforts for the illusion are always the opposite of the real efforts.
To pull
To pull exercises 3.130–3.139
To pull from the side with one arm[229]

Exercise 3.130: Start standing with slightly bent knees in the Eiffel Tower position, body straight. See the object to pull on your right side.
- The left arm is behind the back, the right arm extends and grips it and lightly tests the resistance of the counterforce.
- Attack: The force is gathered in the centre of the body, the pelvis turns around its own axis, the right hip, closest to the resistance, is lifted, and the upper body bends away. (These three movements are done at the same time!)
- Pull: The pelvis moves towards the resistance, the upper body and the head pull in opposite directions, the arm and the hand are fully extended. The illusion that the body ‘hangs’ fully on the counterforce must be created.
Image of the pull: Pelvis, body weight, head and neck backwards, shoulders forwards.
Tug of war: (pull with both hands)
Lecoq taught five different degrees to pull:
- Symbolic pull as gesture: with very small weight shifts, as a gesture only[230]
- Passive opponent, light pull (with opening the body, eclosion)
- Passive opponent, sportive pull (with attack)
- Active opponent, attack, and counterweight
- Being pulled
Exercise 3.131: State 1. Light pull in éclosion: Stand in side lounge position to the right side (or work at an angle of 45 degrees) with the right knee bent, the left extended. Grip the rope. The arms are not fully outstretched sideways to the right with open and flexed hands (the right hand’s palm forward, fingers downwards, in front of the left (left palm forwards, fingers upwards). The body weight is on the front leg. Between the hands is a fixpoint to consider, the rope). Pull in eclosion – all body parts involved arrive at the end position at the same time – that is, the weight rests on the left back leg with bent knee, the front leg extended, the body leaning backwards in the prolongation line of the front leg, as are the neck and head. The arms and hands are held close to the chest.
Exercise 3.132: State 2. Passive opponent, with wave movement, attack and double fixpoint of the hands. Same starting position as above. Before the pull starts, the neck moves forwards in a short and dry impulse, together with a forward knee impulse (otkas). Immediately start the wave movement from the knee. When the wave reaches the pelvis, change the body weight to the bent back leg, and when the wave reaches the head the neck moves back (the head pulls as well).

Exercise 3.133: (See sketch). Pull against an active opponent and gain rope. Start as above.
- When the body weight is on the back leg, chest, head and neck, pull back.
- Keep the fixpoints between the hands and the hands in space. Move the body forwards, passing the hands, with the right leg bent forwards and left leg extended back. Open the left hand (by bending the wrist), bring it forwards, move it over the right hand, ‘present it’ and catch the rope again, then lift the right hand from the rope, remove it under the left hand, ‘present it’ and grip the rope again.
- You have gained rope and are ready for the next pull.
Exercise 3.134: State 4. Active opponent, with attack and double fixpoint of the hands: Same starting position. Attack (quick, small and energetic impulse of neck and knee, pull immediately by translating the body weight onto the bending back leg. There is an active partner on the other side of the rope. Hold the two fixpoints (between the hands and the position of the hands in space) and move body and hands quickly, with your weight forwards again and change the hands as in the previous exercise above, but quickly, if you want to gain rope! At the end of this pull, the shoulders are forward and the neck backwards.
Exercise 3.135: State 5. Being pulled. Same movement as above. The partner pulls you towards him: the hands, shoulders, head, chest and right leg extend as you are quickly and violently dragged forward, in surprise! Keep the body extended for as long as you can, before you fall (body and right leg tensed, the back leg lifted and extended) or ‘break in two’ (the straight back is bent from the centre) and regain your balance.
Variations of mimed pulls (tug of war), inspired by Toni Montanaro[231]
Exercise 3.136: Scud to the right (by body blocking). Starting position: right knee bent, left leg extended, body weight towards the opponent, the arms extended, but the head away from the opponent. He is stronger and pulls you towards him. Quickly lean away and plant your right leg between you and your opponent. Anchor your legs (both a little bent) well on the floor: make (with body block) small scuds backwards with both legs at the same time, the last ones being smaller and quicker.
If you have your body weight on the back leg with your entire body weight, you may execute the small scuds forward.
Exercise 3.137: Rope over the shoulder: In profile, you are not as strong as you could be. If you turned your back to your opponent you would be better off. Isolate your hands (holding the rope, and with an active partner) in space, your shoulder goes back and down (Go ‘towards the rope!’) closest to your opponent. Now you turn the back to him. Lean on the shoulder and try to walk away.
Exercise 3.138: The shoulder jolt: (comic reaction when your partner turns you round again). You stand with your back to the opponent, the rope over your shoulder. You are pulled. Your hands are pressed against the chest, your shoulder lurches backwards, hands and chest move in block, and your head bobs backwards in a whiplash. The hands break loose from the chest, the arms stretch out and move quickly towards the opponent.
Exercise 3.139: The winch: Start holding the rope, body weight on the left, right leg extended. (This leg is your strong base for the movement.) Bring your left arm close to the belly and begin the winch, rotating your body to the left. If you turn, the rope becomes shorter and shorter (the right hand gets closer to the body). After having turned enough – two to three rounds – bring the right arm with the rope to the belly as well. Quickly grasp the rope behind you on the left. Scud onto the right bent leg in front and the left extended back.
State 5: Being pulled and to pull oneself, exercises 3.140–3.145
Exercise 3.140: I am pulled upwards: by the hair (try it first with a partner who pulls you: the partner’s hand on your head), downwards or upwards by the head (plexus straight, up to demi-pointe, floating), or by any other body part. Make the direction of the pull and the reaction of the body clear.
Exercise 3.141: Pulled by the neck: From the position of a rounded body, raise by the neck (but no declosion!).
Exercise 3.142: Pulled by the shoulder: start by lying on the stomach, then turn to the side.
Exercise 3.143: Pulled backwards by the pelvis.
Exercise 3.144: Pulled by the arm(s): quick pulling up, shoulder oblique, lose balance, break (regain your balance or fall).
Exercise 3.145: I pull myself (in a wave movement), by different body parts.
Further applications of the pull: exercises 3.146–3.147

Ringing the bell (pull downwards)
- Catch the bell string on the left side, over your head (present the open left hand, grip, then the right hand under the left hand (the distance between the hand becomes a fixpoint). Shoulders held high, but the head low (‘hanging’ with the hands on the rope), the body extended, weight on the left leg.
- Otkas: Attack by the neck and left leg on demi-pointe, right leg outstretched, lifted from the floor, shoulders low.
- Pull downwards, the shoulders lowered, the head low, pull, down into squatting, hands between the knees, close to the left calf, back rounded, head low, shoulders neutral.
- Rising again: being pulled by the weight of the bell: first only arms up – shoulders up – head – spine – pelvis – left leg, onto toes.
Exercise 3.146: Learn how to ring the bell and practise.
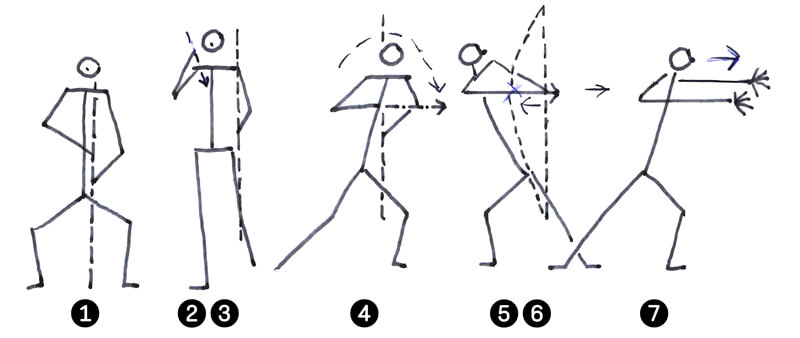
To string the bow and shoot an arrow
(variation of a classical kathakaḷi movement)
- Stand in the samurai position, the bow resting vertically in front of your body on the floor. Hold it with both hands, the left hand higher than the right, double fixpoint (of the distance between the hands, the bow, and the bow in space).
- Let go of the bow with the right hand and use it to reach behind the neck.
- Move your body weight to the right, stretched leg, the left leg placed alongside (or extended), take an arrow from the quiver, (shake the wrist of the arrow-hand).
- Body weight forward on the bent left leg, the right leg extended diagonally back. At the same time, pull the arrow up and out from the quiver, lift it in an arc forwards over your head, and place it on the bowstring.
- Tend to the bowstring (bow fixpoint!) by changing the body weight backwards to the right bent leg, extending the left front leg, and slowly (with some force)…
- Stretch the bowstring by rotating the upper body to the right, and moving the right hand backwards, to the chest, close to the right shoulder.
- Attack: rotate the chest quickly and dryly to the front again, release the arrow by quickly opening both hands, fingers spread[232], and move the chest to front, transferring the body weight forwards into a fencing position, bent left leg in front. Pull the chest out.
- Control where the arrow is placed.
Exercise 3.147: Learn and practise stringing the bow.
To lift a heavy suitcase: exercises 3.148–3.150
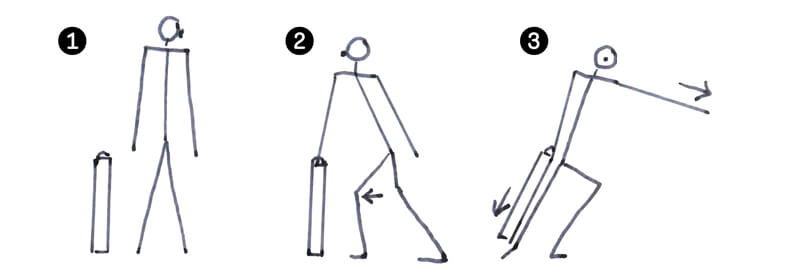
Exercise 3.148:
- The phases of lifting a heavy suitcase: Start in the tree position, with the suitcase on the floor on your right side. Body, arm and the opened hand move towards it, the right knee is slightly bent. The right hand opens and grips (with the right elbow bent!)
- Fixpoint of the right fist: attack (impulse) by knee and neck. (These movements are short, dry, and very small!), the body rises (this happens before the suitcase is lifted from the floor!), and your right elbow straightens.
- Now the suitcase comes off the floor. Body weight transfers to the opposite (left) side (both shoulders down!), lift and extend your left arm as a counterweight (leverage law). The right arm holding the suitcase is close to the side of your body, and the weight pulls down the shoulders, fist and arm. To lower the suitcase again, reverse the lifting movement: By an impulse (knee, torso wave), shift your weight from the left to the right, the left arm descends at the same time, put your right fist at the same time at the same height as it was at the beginning of lifting the suitcase. Open the hand, release the handle, relax, and rise the body.
Make the different energies – carrying the suitcase or not carrying it – very clear.
Exercise 3.149: Learn how to lift the suitcase and to establish counterweight, and practise.
Exercise 3.150: Shift a heavy suitcase from one hand to another.[233]
Begin as per the previous exercise, and lift the suitcase with the right hand off the floor. In the starting position, ensure your right arm stays stuck to the side of your body. Lean your upper body to the left and extend your left arm out to the left. No matter where your suitcase is in relation to your body, your torso must lean away from it. The suitcase is the weight; your torso is the counterweight. As you bring the suitcase in front of you, grasp the handle with both hands and lean back. As you transfer the suitcase to your left, let go with your right hand and lean to the right. Your final position should be the reverse of your opening position: left arm stuck to the left side of your body (left hand, arm and shoulder pulling down to the floor), upper body leaning to the right, and right arm extending straight out from the shoulder.
Tony Montanaro[234]
To push

Jean Soubeyran – trained by Etienne Decoux – mentioned pushing as a three-phase procedure as follows:
- Preparation: The pelvis is behind and over the supporting basis of the legs.
- Attack: Collecting the forces, the pelvis extends forward, the spine rounds forward, the legs are extended behind.
- Resistance: The back leg pushes as strongly as it can towards the floor, the foot lifts and is put in front of the other foot (one step).
There is an important difference between the real, physical action and the mimed action: In the ‘real’ push, the body is supported by the weight of the object to push, the back leg is the support point against the floor. The front leg is only positioned. In the mimed push, the support of the real object is lacking. The back leg is only visually extended, as the weight is entirely carried by the bent front leg.
In the Lecoq technique, there is a difference to the Decrousian technique: The spine is never rounded[236], but kept straight in the push (functional!).
As for the pull, Lecoq mentioned five variations for the push as well:
- Symbolic push as a gesture
- Push with eclosion and passive opponent
- Push with attack and natural wave, functional and sportive
- Push with attack and elan, and active partner
- To be pushed
To push exercises 3.151–3.163
Exercise 3.351: Basic hand push: Hands in front of the chest, but close. ‘The chest is somewhat thrusted forward in anticipation of the effort to be invested, when the hands are touching the object’[235]. When the hands move forwards to push, the chest moves backwards – to compensate for the conflict between the energy of the body and the mass of the imaginary object being pushed. The total image will be one of great strain and effort. The push always starts from the centre of the body, its characteristics being two opposite directions: forwards, towards the object, and downwards, towards the floor that serves as the base of energy. The moving axis of the body, the pelvis, decides the transition of the passive phase into an active phase through the attack.
Exercise 3.152: Change the breathing: Inhale pulling, exhale pushing. Discuss the difference.
Symbolic pushing and pulling as a gesture
Exercise 3.153: Basic push with one hand: From the tree position, take a step forward with the right leg, weight on this leg, and at the same time the left hand starts to move forwards from the chest, palms outside, flexed wrists, fingers upwards, and the chest slightly retires.
Exercise 3.154: Negation (symbolic push). Diminish the leg movement, the weight-shift and the arm movement of the exercise above step by step to an absolute minimum, exhaling. The movement becomes a gesture: ‘No!’
Exercise 3.155: Affirmation, symbolic pull. From the endpoint of the basic push with one hand, with weight on the right foot in front, turn the hand with the palm upwards, shift your weight to the back foot (into the tree position, or Harlequin back, the left knee bent) and bring the palm closer to the chest, lift the chest, as if to say: ‘Come!’
Exercise 3.156: State 2. Push with eclosion and passive opponent.
Exercise 3.157: Start in the open position, right leg bent and to the front, left leg extended behind, heels in line. Touch the object to push – maybe a heavy cupboard – in front of the chest, at a distance of about 25 cm, palms up, angled hand-object must be 90 degrees. (Give energy into your hands and fingers) Elbows down. This is the passive starting point for the eclosion movement (all body parts involved arrive forwards at the same time at the ending point, that is: front leg bent, back leg extended, both arms outstretched, but shoulders neutral). This position is the fixpoint – the contact between the hand and the object to push. Through the wave movement, the arms are extended, the shoulders go back and the point moves – the object is pushed.
Exercise 3.158: State 3. Push with an attack and a natural wave. Functional, sporty timing.
Exercise 3.159: State 4. Active partner. Starting position as above. Attack: by neck and knee. (Push as above, but more.)
Exercise 3.160: Push with attack and elan, active opponent. Starting position as above. (Fixpoints between the two hands, and the hands in space.) Attack (neck-knee) collecting the forces – pelvis forward, leg extended backwards, spine forwards and down, the body moves back from the fixpoint, the arms stretch out and push immediately, the object moves forwards, head forwards, somewhat down, arms outstretched, shoulder back, then take a few steps to show how the object moves.
Exercise 3.161: State 5. To be pushed. Start as above. At the end of the push, with the body forward, engaged as a counterweight, the body realsises there is no counterweight. The front leg extends, the body stiffens in surprise and loses balance in an oblique position.
Exercise 3.162: You are pushed backwards. The opponent is stronger and pushes you back. In a body block, you fall backwards.
Exercise 3.163: I push myself. This is the impulse, (studied since level I). Push yourself into various activities: to walk, sit, turn, etc.
The following exercises on pushing (pulling) or being pushed (pulled) are practised in four phases:
- Coup – the action, maintain lack of balance for as long you can.
- ‘Breaking’ – the flop.
- Losing balance in surprise.
- Catching balance again (with end pose) or falling (with end pose)
Being pushed exercises 3.164–3.168
Exercise 3.164: Pushed by the shoulder: ‘breaking’, losing balance (the elan of the shoulder should not be visible!)
Exercise 3.165: Pushed by the plexus from the front: ‘break’ the body, fall backwards.
Exercise 3.166: Pushed in the back from behind: (push in the middle under the shoulder blades.)
Exercise 3.167: Pushed by the bottom from behind.
Exercise 3.168: Pushed by the knees from behind: dry coup, break in the knees.
Applications:
Push downwards exercise 3.169
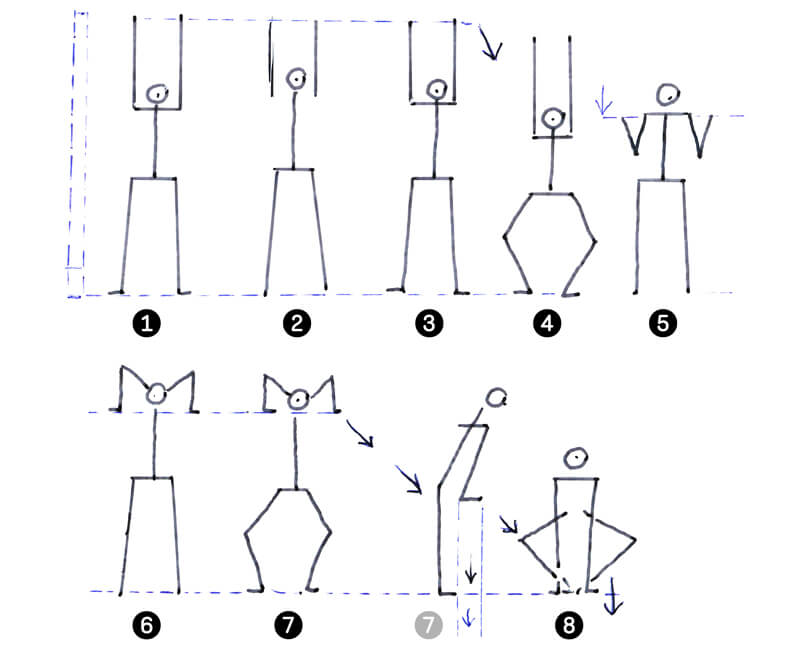
Push downwards: Hitting a post into the earth. See sketch: The action is built on resistance, on pushing and pulling (and is a good pre-exercise for climbing the wall). It should be practised in four ways:
Exercise 3.169: Push downwards with attack:
- Start in the tree position, lift the arms high, put the hands on the top of the pole, 90-degree angle of hand(s) and wrist(s).
- Hang on the post, (shoulders high, arms extended),
- short attack by knees and neck, lift the body (rise on toes!) shoulders low.
- Move immediately into hanging position again.
- Start to pull by bending the knees.
- Raise and extend the knees, arms descending to chest height.
- Both elbows move over the pole, one by one.
- Push, fixpoint by the hands. Descend to the depth the pole should reach in the earth while bending the knees.
Weightlifting exercise 3.170
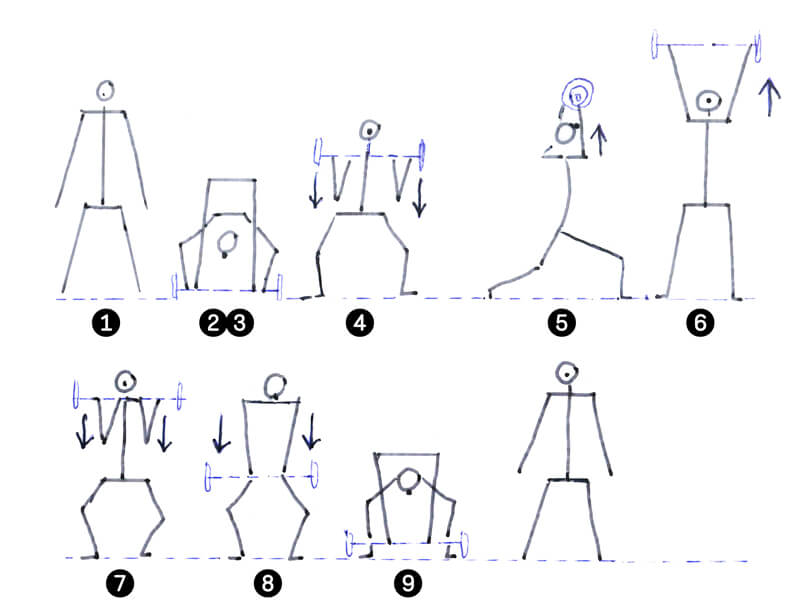
A mimed action, built on pushing and pulling. See sketch.
Exercise 3.170:
- Stand with bent knees in a large sliding tackle (Eiffel Tower or Samurai position), looking at the rod on the floor.
- Arms and hands move towards the lifting rod, the pelvis high, bending the knees, standing now in large samurai position.
- Grip the rod (from here, fixpoint between the hands). Attack the lifting: pelvis high, wrists extended.
- Lift the rod with an impulse with the chest pushed forward, lean backwards, the wrists at angles of 90 degrees, elbows close to the body.
- Hold the fixpoint between flexed hands, shoulders low, lift the arms with the rod and extend them over your head, while at the same time bringing the right leg forwards, deep into forward fighting position (back leg bent).
- Move the legs with an impulse into the Eiffel Tower position, bending the knees. The rod is still held over the head, with outstretched arms.
- Lower the rod quickly to the chest again, but under control, down on the extended chest again, shoulders down, elbows pressed to the body.
- Lower the rod. The arms with the rod move downwards again: first descending the arms (with extended wrists), shoulders down.
- With pelvis up, lower the rod quickly.
- Open the hands, bending the wrists upwards, leave the hands, and rise again.
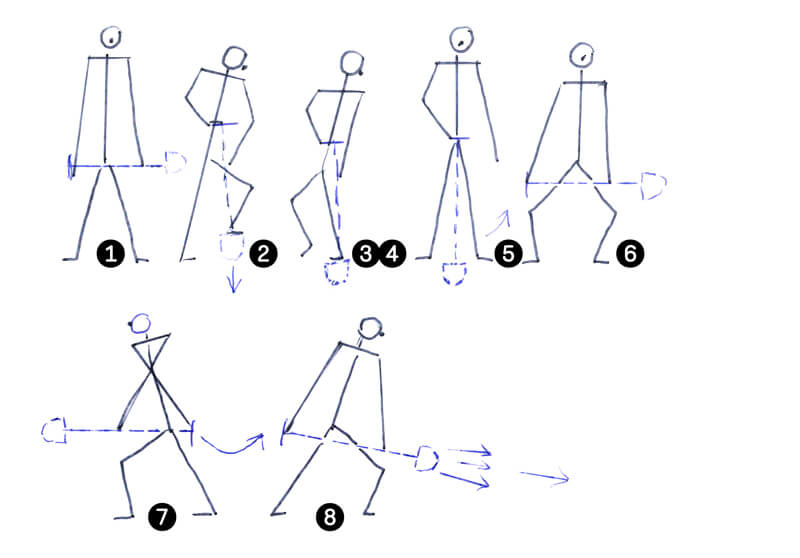
The shot-putter exercise 3.171
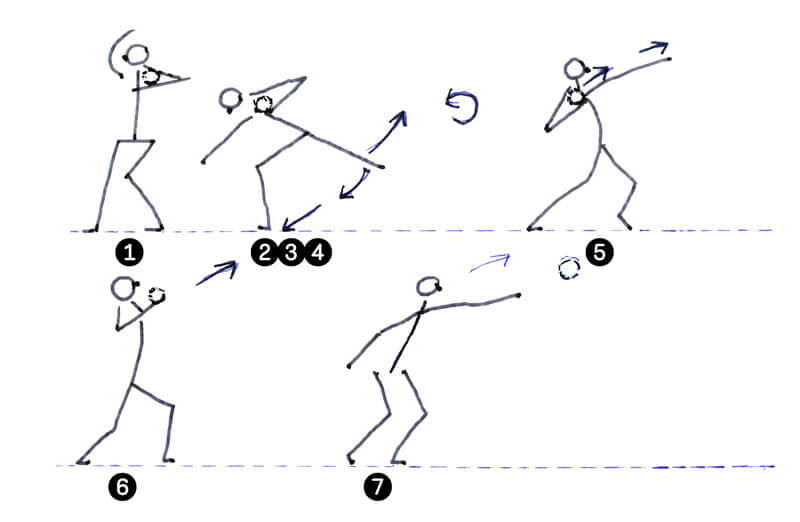
Exercise 3.171: He pushes (not throws!) an iron ball, about 7 kg, 12 cm in diameter through an explosion-like stretching of the arm, sustained by twisting the body, by force and momentum. The body force is transferred to the acceleration path of the iron ball. For achieving momentum, the shot-putter stands in a circle.
- Stand in a sliding tackle, knees slightly bent, on the right supporting leg, with the left leg resting on the ball of the foot. The iron ball is held on the right side in the angle of the neck, beside the chin. The arm is bent at shoulder height. The free arm is extended forward and rounded. The left leg rests on the ball of the foot, relaxed, with knee slightly bent.
- Starting phase: Bend the body forwards, knees bent, left leg back.
- Gliding phase: Lift the left leg and move it again alongside the supporting leg (otkas).
- Jump backwards onto the supporting leg and straddle, knees bent.
- Twisting and accelerating phase: Landing on the left leg, twist the shoulder and pelvis axis in a half-twist to the left (180 degrees), and in an explosion-like movement, transfer the body weight to both legs, with the left arm rounded over the head.
- Pushing phase: By starting to pull the arm in an arc forwards and upwards, and with the weight now on the left leg, make a quick forward movement of the elbow, pushing the iron ball forwards and away.
- Catching phase: The upper body is raised, the right arm stretched forwards. The body weight falls on to the right leg to regain balance.
- Reaction phase: Lower the right arm and realise the result.
The javelin thrower exercise 3.172
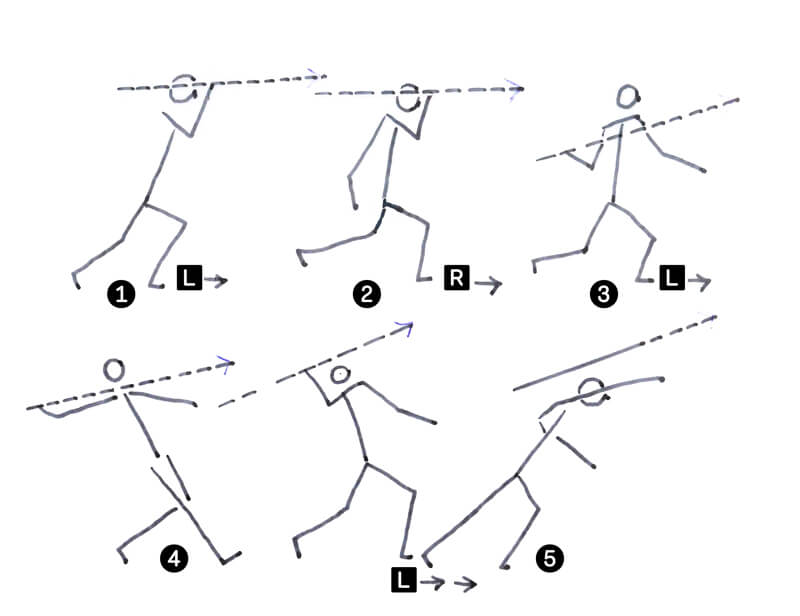
Exercise 3.172:
- Stand on the right leg, with the left leg rests relaxed alongside, on the ball of the foot. Hold the javelin with the right hand over your head (grip in the middle – the balance point of the javelin – with thumb and forefinger, other fingers in an open fist), the right elbow higher than the shoulder, and balance it slightly, moving forwards and backwards.
- The run-up is a total of five steps (on the spot) balancing the javelin over the head, r, l, r leg (lift only the legs or use a pressure run).
- Impulse step (fourth and fifth) l, r (above) with the left step, rotate the hips and shoulders to the right.
- Pressure step left (weight back, left foot wide forward, push off with the left heel, returning the javelin: the right arm goes back, the upper body leans back, with hip and shoulders rotated to the right, and the left arm rises. (There is an imaginary line of a tended bow between the back foot and the javelin hand.) The centre of gravity is to the front. At the same time the javelin arm goes back, the javelin is in line with the eyebrow.
- Twist the body forward and throw the javelin, with the right leg bending and lifting, body weight shifting forward through the impulse of the throw.
- Conclude by regaining your balance on the right leg. Look forwards, react to the throw. The entire action is an acceleration.
Classical discus thrower[237] exercises 3.173–3.185
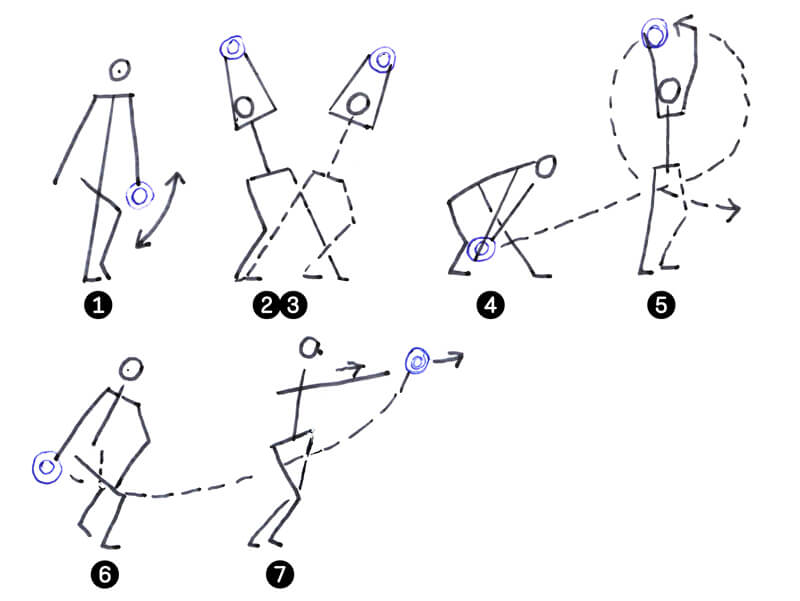
Exercise 3.173:
Start by standing erect, with the weight on the right leg, left foot relaxed and placed alongside (with the ball of the foot on the floor), and the discus in the left palm, arm extended, right shoulder lower, right arm slightly lifted from the body.
- Start with a wave movement from the knees to balance the left arm with the discus forwards and back.
- Grab the discus between both hands, extend the left leg forwards, bend the right leg, the upper body back in prolongation of the front leg), with weight back, outstretched arms with the discus between the hands.
- With the impulse from the left knee, transfer the body weight by bending forwards (into a fencing position), extending the left leg.
- The outstretched arms with the discus between the hands move in a big arc forwards and downwards, between the legs, right knee bent, left leg extended forwards, weight on the upper back leg and bent forward.
- The right arm with the discus describes a big circle, starting downwards and backwards, and when the arm is over the head, the left leg moves back.
- The ball of the foot rests behind the right foot, the left hand rests on the right thigh, and the upper body twists to the right, and the right arm with the discus is extended to the rear (in the position of the classical Greek discus thrower in the Louvre!)
- Throw: Rotate the body to the front again in a quick and energetic movement, and the right arm (in a flat half-arc) with the discus (held with palm downwards) is thrown towards its aim (in the final movement, a turning impulse by the wrist and fingers to the left is given to the discus). The impulse and the throw cause the body to extend, with the weight moving forwards, in a state of imbalance, while the glance follows the trajectory of the discus.
- Ratrape: by taking a step left and forward, balance is regained, with the right arm lowering slowly. Then react.
Exercise 3.174: Breathing movement in the three different phases (inhalation, holding breath, exhalation.)
Exercise 3.175: Melodrama: Movement with only one arm, or without arms.
Exercise 3.176: Carry the movements to achieve extreme balance.
Transfer of the discus movement: justify each of the five positions.
Exercise 3.177: In great sorrow.
Exercise 3.178: Hands in front of the face, in great pain.
Exercise 3.179: The pain is nearly crushing the person.
Exercise 3.180: Add turns in pain.
Exercise 3.181: ‘Throw the sorrow far away’. Transfer the throwing into ‘throwing the pain far away’.
Exercise 3.182: Move each position forwards or backwards with steps.
Exercise 3.183: Laughing: move each position forwards or backwards with steps, laughing.
Exercise 3.184: Breathing in small scale, with small weight shifts and gestures, in shyness, psychological.
Exercise 3.185: Indication: each movement is an indication, is explicative.
The bowler exercise 3.186
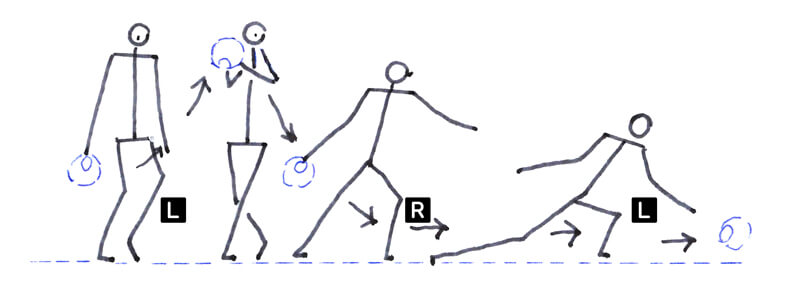
Exercise 3.186:
- Standing in the basic position, with your weight on your right leg, grip the bowling ball on your right side and lift it, rising, with shoulders low, upper body bent to the right. Stand with arm and wrist stretched, shoulders low, body weight to the left. Balance the ball lightly forwards and backwards, with impulse from the knees, causing a little wave through the body. Aim for the pins, and align the throw.
- Otkas: Bend the elbow of the arm holding the ball towards the body.
- Take two steps forward: left and right. The left arm stretches back diagonally. The third is the main step forwards: bend the legs very deep (left in front), and the back leg also bent, with the impulse of the right knee and right arm with the bowling ball outstretched behind.
- Throw. Swing the ball forward, and give the hand a kick as you release the ball from the hand when it’s nearly on the floor. (Accentuated beat.)
- Raise the body with your weight forward and the left arm lowered, and react.
The golfer exercise 3.187

Exercise 3.187:
- Starting position: golf club held with left hand lower than the right hand. Stand with open legs, imagining a circle around your body.
- Small testing movement
- Haul off
- Hitting
Climbing
Staircase exercises 3.188–3.191

The upwards staircase (with railing)[238], simple technique
Exercise 3.188:
- The right leg is placed forward on the ball of the foot (touching the imaginary step of the stairs). With the impulse of the pelvis, the body weight is transferred over the right leg.
- The right heel of the ‘stepping leg’ pushes slowly (with force) downwards, the upper body rises, and the knee extends as the heel touches the floor.
- The back leg, hitherto extended, bends, the heel lifts, the foot lifts and touches the next step level. Look up, to the top of the stairs.
The arms: Putting the ball of the foot on the step, extend one arm diagonally upwards, open the hand and grip the banister. (The movement of the arms design the banister and show the arm of the climbing person!) In three steps, the hand moves diagonally downwards (describing the banister line), the hand opens and reaches upwards to the next hold (1=descend, 2=descend, 3=descend, 4=leave the hand and move it up again.)
Exercise 3.189: Practise climbing the stairs on four beats:
- 1. Put the ball of the right foot on the next level (raise the heel high!) with the left leg with a stretched knee.
- 2, 3, 4. The pelvis moves forward and transfers the body weight to the ‘stepping leg’. Slowly pressing down on the right heel, the leg straightens, and the left leg bends.
- 5. Lift the ball of the left foot to the next step, etc.
Staircase with fixpoint of the weighted leg
This is a more advanced movement. In this technique, the height of the step is created. This demands acrobatic balance and good body control.
Exercise 3.190: Staircase (upwards). Start as above, but put the right foot, flexed (at an angle of 90 degrees!) on the imaginary step. The upper body moves to the right (straight and bent a little over the right leg). Rise the heel of the left foot, transfer the body weight to the right and descend the leg slowly, on three beats, until the foot touches the floor and the leg is straight. At the same time, the left knee bends and the heel lifts from the floor. Lift the left flexed foot (at an angle of 90 degrees), followed by changing the upper body over the left side (with the railing as in the previous exercise, on 2–4 steps).
The downwards staircase
Exercise 3.191: The basic movements are the same as moving upwards. The body weight and look are directed downwards. The banister reaches diagonally downwards.
Climbing a ladder 3.192–3.194
Exercise 3.192: Stand in the basic position in front of the ladder and grasp a rung with the right hand. The other hand grasps the rung above. Isolate the left hand (fixpoint), release the right hand, and grip the next rung above the left hand. Move the hands up and down on the ladder. Also define the sides of the ladder – you can grasp the sides from the outside and combine with a rung. The distance between the right and left hand should stay the same! Important: One hand always has to be on the ladder, with the other hand moving! (Between the rungs and the sides there are fixpoints!)
The technique for climbing the ladder is similar to the simple technique of the staircase. Body weight on the left leg, body weight transferred to the right leg, slow ‘crash’ of the right leg t=so the leg is extended and the foot is flat on the floor, with left knee bent and the heel raised. Now the right leg becomes the supporting leg. The left foot is put on the next rung. Switch hands upwards, one by one.
When climbing the ladder, you must consider two fixpoints: The fixpoint of the rung is kept alternately by one foot (with the other flat on the floor), with slow descending, a slow crush, with resistance in the other foot from the ball of the foot to the flat foot. This is the same for the hands: the rungs must be shown in equal distances from each other.
Be aware of the upward movement! The chest is lifted, and eyes gaze to the next rung.
Ascending (and descending) the ladder[239]
Exercise 3.193: Leg and foot action as per climbing the ladder: (Important: The body should not move up and down!) The knee bends and straightens as the heels go up and down. Stand in parallel position and raise the right heel (of the bent right knee foot), press the ball of the right foot down into a flat position and raise the left foot on the ball of the foot (without going up or down with the body): The change between the right and left bent leg indicates that you have ascended one rung of the ladder.
The distance between the right foot (on the first rung) must be the same as the distance between the hands on the rungs.
You don’t just move – you go towards a destination!
Exercise 3.194: Pierrot climbs up to the moon. Improvisation. Pierrot wants to take down the moon for his love, Columbine. He brings a ladder, and climb, higher and higher. The ladder sways in the wind! Show perspective: the ladder becomes smaller the higher you climb.
Climbing a vertical bar[240] exercise 3.195

Exercise 3.195: Start in the T position, right foot back, in front of an imaginary bar (anchored in floor of the roof). The body weight moves onto the left leg, grasps the pole with both hands, with the left hand higher than the right hand. The right leg wraps around the pole and the foot is at knee height. (Keep a straight line between the knee and the upper hand, and the fixpoints between knee and hands.)
Attack: Arms and hands pull towards the centre of the body, while the right leg descends to the floor (fixpoints!), and at the same time the supporting left leg bends and the heel is raised.
The right leg wraps again around the pole, the hands are raised one by one and they take a new hold, right hand first, left hand thereafter and over the right hand.
Rope climbing[241] exercise 3.196
Here, as for the ladder, hands and arms stay equidistant (fixpoint) as the body ascends or descends.
Exercise 3.196: Grasp an imaginary rope with one hand above your head and hang there, shoulder high, head low, free side relaxed. Make sure your solar plexus is lifted and hangs directly under your hands. The centre of gravity must fall directly under the imaginary point.
(Stand frontal or profile.) Grasp the rope with both hands, heels flat (1). Rise on both toes, while at the same time the hands are lowered to the face (2, 3). Change hands (4).
Climbing a wall exercise 3.197

Wall climbing[242] is a combination of hanging, pulling and pushing. The floor and wall levels change four times (comparable to a photograph of the same object taken from different heights). The rhythm of the action is very important.
- Stand and look at where you want to reach.
- Otkas: knees bending, the arms swing back.
- Stretch the arms upwards, mime the jump, body in the air.
- On toes, shoulders low, angle of arm and hands at 90 degrees, neck normal, hang on the wall: shoulders high, neck low (first wall level change). Steps 1 to 4 in a quick movement, in one flow.
- Attack (short!), neck high and shoulders low, on toes, and continue immediately to the next movement.
- Move the arms down to shoulder height (In reality, the body is pulled up. Second wall-level change) Slow movement, effort!
- Move the right arm over the edge, elbow high and supported by the hand.
- Put the left arm over the edge. 7 and 8 are quick movements.
- Still on toes, lower the heels slowly and lower the hands to the height of the hips (third wall level change) at the same time, bending the chest forwards.
- Place the right foot (outside the right hand) on the wall.
- Descend in fixpoint (hands and right foot in line) down to the floor, (fourth wall-level change) in a slow movement.
- Free right hand and left foot.
- Place the left foot and rise, standing on the wall.
- (Look back to where you came from).
- Look where you want to jump down.
- Otkas as in no. 2.
- Jump in slow motion, ‘spiralling’ downwards.
- Arrive with an accent in the landing pose (fifth wall-level change, as per level one.)
- Look back up to the wall.
Exercise 3.197: Climb the wall. Learn the movements globally first. Study the action rhythm according to the plate.
Mountaineering exercise 3.198
Exercise 3.198: Climbing a rock.
- Stand close to the rock. ‘Grip’ the imaginary rock with flexed left hand, fingers forwards (about shoulder-height), elbow low.
- Support the right hand on the rock at hip height, lift the toes and
- Descend the heels, with fixpoint between the hands.
- Lift the right leg, place the foot beside the right hand, leave the right hand where it is, move it as high up as possible and find a new grip.
Now you must pull yourself up: Keep the distances between left hand and left leg, right hand, and right leg as fixpoints. Lift the heel of the supporting leg, and slowly, on four beats, lower them. (in reality, you would ascend!) The right hand moves at shoulder-height to a new hold. - Free the right hand, find a new grip higher up, onto the toes, and descend with the fixpoints between hands and leg.
- Change arms, on toes, descend the heels, etc.
Locomotion – Walking and running
To walk is a double pressure, both forwards and downwards. The rhythm of walking is essential: there are accentuated moments of pressure and feeble moments of regrouping the legs. Study the rhythm of a real walk. First some real walks, thereafter mimed walks (not advancing in space, but walking on the same spot).
The walks
Walks exercises 3.199–3.217
Greek walk (noble walk)
Exercise 3.199: From the tree position. Walk and exhale, with the body weight constantly on the front leg, the buttock muscles contracted, as well as the muscles between the shoulde-blades. Fell the air under the arms, slightly lifted away from the body. Start the walk with the pointe of the foot and transfer the weight forwards. The back leg relaxes. Turn the head when you inhale, turn the body while holding your breath, move the head while inhaling, hold the inhale, and exhale when walking again. This is the airy walk of the ballet dancer.
Noh walk
Exercise 3.200: Noh walk. From a basic, parallel position, buttock muscles contracted, knees slightly bent, shoulders down, pelvis tilted forward and down, back kept straight ‘as if having swallowed a sword’. Buttock muscles held inward, knees slightly bent, shoulders down, the pelvis tilted forward and down, spinal line straight ‘as if having swallowed a sword’. Upper arms turned forward, but underarms turned out. Keep the body weight constantly forward. Start walking on the heels (with flexed foot), shuffling the feet forward. In this walk, the balance point of the body is kept low, an earth-to-earth-walk.
Chinese female walk with arm movements[243] (co-ordination)
These movements are small, soft, subtle and playful, with gentle wrist movements, but very precise. The waist always twists lightly to the opposite side, as well as the head. There are dips, small steps and wrist movements that need to be practised thoroughly by female impersonators.
Exercise 3.201: Huadan walk. Stand in the female position, lifting the back right leg, heel flexed, and cross directly in front of the left, feet turned out a little. The next step crosses in front of the right. Walk with a small dip (relaxed knees).
The opposite arms, hands with orchid fingers[244], walk swing, navel height, in opposition to the legs, forwards and sideways, arms not touching the body.
Exercise A3.202: Warning finger. Walk as above. Left arm on the hip, in the orchid position, palm outside. The right hand with extended forefinger (the other fingers in a loose fist) starts in front of the body, with a soft wrist movement pressing the wrist forwards, then move the hand and the underarm in a little arc to the right side (the right elbow is still bent) and point by moving the wrist.
Exercise A3.203: Hand to show the hair. Walk as above. The hands in the orchid position in front of the chest, palm downwards, elbows lifted. Turn the right wrist to the outside (palm up) and lift the hand (palm up) gently 12 cm in front of the ear (followed by the eyes). Finally, turn the head diagonally to the left. The left hand, with the palm turned up, moves towards the left ear, crossing the downward right hand inside, with the right palm turned downwards in front of the waist and the head turning to the right. When the right hand is moving upwards, the left foot is in front.
Exercise 3.204: Half-circles, female walk as above. With the hands 10–15 cm in front of the chest, elbows lifted, palms down, hand in the orchid position with fingers to the front, with wrist movements (upward movement wrist down, downward movement wrist up) the hands describe gentle upper half-circles to the outside (the wrists in prolongation of the underarm, the angle of elbow and underarm about 110 degrees) and return to the centre.
Exercise 3.205: Point with finger. Walk as above. Both hands in front of the chest, loose fist, forefinger extended upwards, describe circles upwards and forwards in front of the body (chest to chin height), one hand after the other. When the right hand comes down towards the centre, the palm turns inwards towards the body. The left hand rises, the palm turns forward. Each time the eyes focus on the raised finger.
Exercise 3.206: Chest circles around the body. Walk as above. The left hand (with orchid fingers), is held with palm inside, in front of the left hip, while the other hand describes a circle in front of the body with fluttering fingers (in an upwards movement) and descends to the hip, and the other hand rises and circles.
Exercise 3.207: Garden description. Walk as above. Describe with both arms and fluttering orchid hands, palms down, a flat circle crossing in front of the body, from left to right (as if describing water), followed by the eyes.
Exercise 3.208: Shyness. The arms are open to the sides (120-degree angle of underarms and elbow) and initially describe soft inside wrist circles with the orchid hands, with the elbows a little lifted. The right hand lifts and touches the right side of the chin with the middle finger, and the left arm moves to the side. The upper body turns diagonally in the direction of the left open arm.
Exercise 3.209: (slow kunju walk[245], on 8 beats)
Beat 1: (start in the basic position, body weight fully on the left straight leg, right ball of the foot resting on the floor, 5–8 cm behind the left heel, with the right leg bent with the knee touching the back of the knee of the left foot and giving the position stability. Hands on hips, palms facing outward in the orchid position).
- Lift the right foot, heel flexed.
- Move the right foot, close behind the left heel.
- Move the right foot (not touching the floor!) along the side of the left foot to the front.
- The flexed heel has arrived in front of the toes of the left leg.
- Put the right heel on the floor.
- Roll the right foot.
- Shift the body weight slowly onto the right foot.
- Weight is fully on the right foot, and the left heel is lifted.
Exercise 3.210: Add arm-movements to the previous exercise. Start with the opposite arm in front. On a beat of five, the arms have changed position.
Indian dip walk[246]
Exercise 3.211: Walk with rather small steps, from the heel. When the body weight is in front on the extended leg (the back leg behind, relaxed, the balls of the foot on the floor), dip (bend and extend the knee).
Some Indian Bharatanatyam walks
Exercise 3.212: Dip walk forwards: From the basic position, feet together, hands on hips, palms outside. With the right foot, take a small flat step forward with a dip (slightly bending the knees). Then move the right foot with a soft stamp beside the left foot, at the same time as the left leg stretches again.
Exercise 3.213: Practise this dip walk continuously with the right leg (or the left leg) to the rhythm one – two, one – two.
Exercise 3.214: Previous exercise, offbeat. Before you step forward on one, the left weighted leg bends softly in the knee and the right foot lifts to the ankle, one: The flat step is taken on and.
Exercise 3.215: Backward walk: Feet in the tree position (stamp with the right leg in place, on one), the right leg with the body weight extends backwards on beat two, diagonally. The left leg with flexed heel is extended, and the upper body is kept straight.
Exercise 3.216: Add arm movements to the backwards walk above. Right back on 2: both arms extended, diagonally in line with the legs, both hands in alapadma-mudra[247], on 1: the hands (with elbows out) 15 cm in front of the chest, in hamsasya-mudra[248].
Exercise 3.217: Practise the described walks (Greek walk, noh walk, Chinese and Indian walks), with slow and very slow tempos first. When you are confident, practise them a little quicker and with accelerations.
Mimed walks (not advancing in space) exercises 3.218–3.219
Exercise 3.218: From standing to walking through enlarging weight shifts. From the tree position, start by balancing the body to the right and to the left, the weighted leg slightly bent by lifting the heel, then enlarge the balancing by opening the legs to the Eiffel Tower position, enlarge the balancing further, relax and bend the weighted leg, start to lift it and walk by first touching the ball of the foot to the floor and then descending the heel, the unweighted leg stretched, and change balance to the other side. Enlarge balance shifts constantly. Keep the same rhythm throughout until you reach a lyrical walk.
Exercise 3.219: Diminish the big lyrical walk above back to the beginning, so you are ending in weight shifts in the tree position and balancing your weight to the right and left.
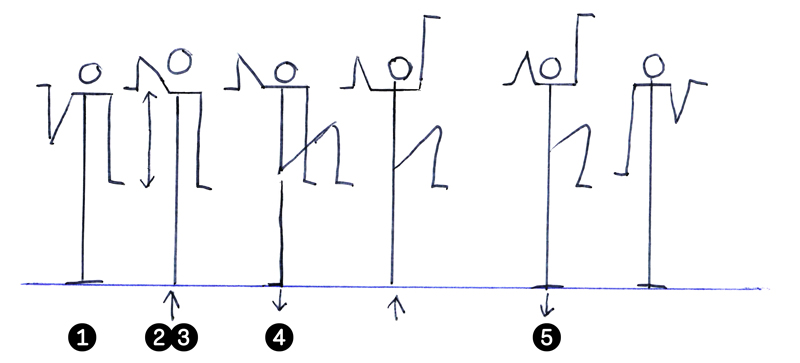
Classical mimed walks
Dynamic frontal walk (or pressure walk) (on the same spot), frontal[249]

- Start in the Eiffel Tower position. 1. Lift the ball of the right foot, bend the knee and place it on the same spot. Move the body weight over to the right.
- Lower the right heel slowly. At the same time, drag the left leg diagonally back towards the inside along the floor, and raise the upper body again.
- Lift the ball of the left foot, bend the knee and place it on the same spot. Move the body weight over to the left.
- Lower the left heel slowly. At the same time, drag the right leg diagonally back towards the inside, along the floor.
The head moves in a straight, horizontal line, from side to side, without up- and down-movements. The arms are a little lift away from the body, and one arm is in front.
This is a very dynamic walk, which can be reduced and enlarged. It’s very lyrical and slow, or quick and sustained. The head must move freely, as if to react to a situation.
The classical walk from profile[250] exercise 3.220

- Feet parallel, body straight, legs extended. (Body weight forward!) Flexed right leg, heel touches the floor beside the toes of the left foot.
- Drag the right leg with flexed foot in a sliding movement back (instead of stepping forward!) and drag it back, skimming the floor so it is fully extended, while at the same time the left knee bends. The body weight is now in the middle.
- Lift the left heel from the floor. The left leg extends with the flexed foot, and the body weight again shifts forward. The arms move opposite each other, relaxed and a little lifted.
Exercise 3.220: Mime walk, in profile. Practise the walk described above.
Walk in perspective[251] exercise 3.221
Important: In all the mimed walks on the spot, try to move the head freely, to see the world – if not, the walk remains a stiff, technical exercise only!
Phase 1: The starting movement is small. Look relaxed and far away on your horizontal line. Imagine being small and far away in space, and slowly, step by step, coming closer.
Phase 2: The walking movement is enlarged step by step, and the rhythm gets quicker and more concise.
Phase 3: The walking movement is large, seen from close by, but the rhythm is somewhat slower! This is the end point of the perspective walk.
Exercise 3.221: Practise the perspective walk.
Applications:
Walking against the storm[252] exercises 3.222–3.223
Exercise 3.222: Start with an accentuated pressure walk. Bend the torso backwards. Then, due to the wind, the pressure is too high, so you recoil, the torso coves in, with a series of small, quick steps. You will be pushed back! Build back to the advancing movement, with slow, determined steps, slowly increase the lifting of the bent back and torso. Use the hands to protect yourself against wind, rain or snow.
Exercise 3.223: Walking against the storm with an umbrella (scene from the kunju-play Mudan ting).
Running
Running in circle with as small steps as possible (female Chinese locomotion in circle (nüzi yuan chang), imitating the female walk with the qiao, the special small shoe Chinese women (and their impersonators!) used for simulating bound ‘lotus feet’).
Feet together, body weight in front, advance with the right leg half a foot by putting the heel on the floor and quickly rolling the foot from heel to toe and lifting the other foot. The feet nearly rest on the floor, the body weight is forward, and the steps must be very small but very quick.
Running exercises 3.224–3.227
Exercise 3.224: Practise the female Chinese walk with a newspaper between the knees. To walk quicker, augment the pressure downwards.
Exercise 3.225: Actors’ circles. Start with the arms in a fixed position, not moving during the walk (one arm on the hip, the other extended sideways, elbow slightly bent, palm downwards, thumb spread out from the rest of the fingers. Alternatively: left arm bent in front of the chest, second arm bent over the head, palm up.) Gliding – by running forwards in big circles (yuan chang) as practised by traditional male Chinese actors (in big circles on the stage), with quick steps, upper body with arms and pelvis kept immobile, weight to the front, with pressure to the front and downwards.
Exercise 3.226: Acceleration of yuan chang. Same walk as above. Start in medium tempo and move quicker and quicker.
Mimed running

On one leg (in slow-motion or with speed)
The pressure run[253]
Exercise 3.227: The pressure run. Start in the basic position (legs together).
- Lift the right heel, press the heel down with straight legs, transfer the weight to the right leg. Bring the heel of this ‘stepping foot’ down.
- When it touches the floor, the knee bends and the ‘chased’ (left) leg glides backwards and extends, with the foot parallel to the floor. Then the body comes back to the starting position (on toes).
- The left leg is weighted and seen to be the ‘stepping foot’.
This movement can be done at a sportive speed or in slow motion, and it works well in profile.
Riding a bicycle (frontally or in profile) exercises 3.228–3.229
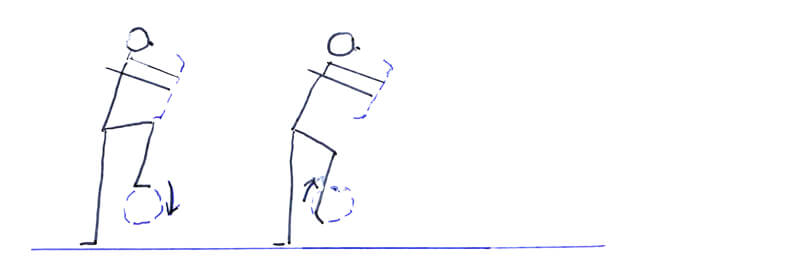
Exercise 3.228: (This is a variation of the pressure run.) Stand in the basic position, feet together. Holding imaginary bicycle handlebars with both hands (to establish a fixpoint between the hands, symbolising the handlebar). The upper body leans forward. The right leg is lifted and flexed, then put on the imaginary pedal. (1) Lean the weight of the pelvis and upper body to the right side and start pedalling when you lift the left heel, putting your upper body weight to the left. (2) Describe a small circle with the right foot. At the end of the circle (3) the upper body leans again over to the right side. Continue. Free the head.
Exercise 3.229: Improvise by performing the Chinese version of the bicycle[254] – a boy and a girl on a bicycle on a hot summer’s day. Improvisation.
Skating[255] exercises 3.230–3.231
Exercise 3.230: Skating: Start in the basic position. Hands joined at the back. The upper body straight (some performers bend the shoulders forward). The head is kept forward. 1. The right leg pushes back diagonally with toes pointing forwards and extends, while the left leg bends. 2. The right foot only slightly lifts from the ice, turns inwards, and moves from behind in an arc alongside the left leg. 3. Jump onto the right foot (the glide), without saccade, and start to extend the left leg.
Arms: Opposite arm in front, elbow bent, hand in front, up to the maximum height of the chin, other arms extended backwards diagonally.
Exercise 3.231: Learn the technique described above while slowly skating straight forwards, then curve (put one foot over the other to the side) 3–4 times (move only the arm on the same side) or accelerate.
Flying bird exercises 3.232–3.234
Exercise 3.232: Lift the wings, and keep them in acquis, because there are bones in them! Flying upwards (accentuated beat): ‘Leaning’ on the air, shoulders down and pressing the wings downward, the body of the bird is lifted to accentuated beats (1,2). In the second phase of the flight, lift the shoulders and the elbows, fold the wings a little, and the body ‘descends’ (1, unaccentuated beat).
Exercise 3.233: Landing as a parachute, stopping with an extended leg forward, the body moves backwards.
Exercise 3.234: The flight of different birds. (Watch birds fly). Small birds with a wave movement of the wings, etc. How do birds leave the ground, how do they fly and how do they land?
Locomotions in water
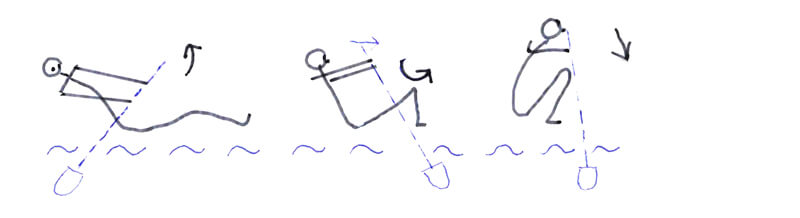
Swimming exercise 3.235
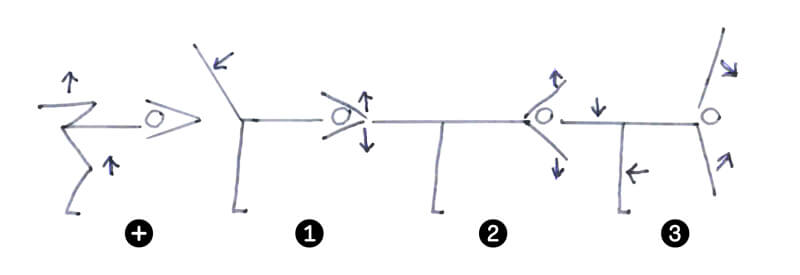
Exercise 3.235: Swimming. (See sketch) +: Stand on the bent right leg, spine and arms bent forwards parallel to the floor (in line), hands joined in front of the chest, fingers forward, elbows lifted. 1. The right leg straightens (the body ascends in the water), the left leg opens to the side, parallel with the thigh. 2. The leg movement continues so the right leg is behind, while at the same time the arms have started to open sideways. 3. The outstretched arms open diagonally, and the body ‘descends’ again the supporting right leg bends into a demi-plié, the left knee bends again and the hands join, as in 1: Movements 1 and 4 are unaccentuated and ‘weak’, while movements 2 and 3 show the resistance of the water and are strong and longer.
Paddling (canoe) exercise 3.236

Exercise 3.236: Paddling
- Kneeling in a canoe, with the paddle in the right hand (fixpoint between the hands).
- Dip the paddle blade forwards into the water, turn it horizontally into the water, the upper body rising (while kneeling).
- Pull backwards (resistance of the water, the body weight transfers slightly to the left).
- When the paddle ‘arrives’ at your right side, kneel again, lift the blade of the paddle vertically (by wrists turns) over the water.
- Raise the upper body again, dip the paddle again forwards into the water, turn it horizontally (by wrist turns) and pull, then continue with 1.
Keep the paddle in the same position and use it on the left side as well.
Rowing exercise 3.237
- Sitting on a bench, knees bent, feet flexed on the floor. Bend the upper body forwards, as you grip the oars (on the right and the left) with straight wrists, and pull upwards and towards you, by extending the legs and transferring the weight of the straight upper body backwards (wrists and arms straight!)
- Push the oars downwards (The blades lift from the water) by flexing the wrists and pulling downwards and forwards. When the oars are close to the body, bend the wrists and pull the blades in the air moving backwards and upwards. Rowing is pulling and pushing.
Exercise 3.237: Practise the rowing movement.
Sculling exercise 3.238

Exercise 3. 238: With a single oar over the stern. Stand in the boat in a fencing position, right leg bent in front, left leg extended back, and hold the oar with both hands, right hand higher than the left.
- Start to pull, transferring the body weight to the bent left back leg, shoulder forward, wrists straight. The right front leg is extended.
- Push the oar downwards and forwards, shoulders back, and transfer the body weight forwards, with flexed wrists, then upwards, turn the wrists up again and start to pull again. The arms describe a figure of eight, with the left arm making the bigger movement.
The ferryman (Le passeur)[256] exercises 3.239–3.257

Exercise 3. 239: The movement should evoke the gentle balancing of a small riverboat on the water. The water flows from left to right.
- Stand in the samurai position. See the pole on the floor, bend the body towards it, open your hands, grip the pole (right hand under palm up, left hand over, palm down).
- Lift the pole horizontally in front of the body, wrists straight.
- With an impulse, lift the pole diagonally left up, right hand higher than the left (fixpoint between the hands!) and turn the head in the direction of the journey.
- Move the body forwards, attack of the knee, fighting position (left leg bent and in in front; back leg extended,) and let the pole enter the water.
- Open the left hand and let go of the pole, (let the right hand glide down first, left hand over). Put the left hand on the pole again, at a distance of ca. 20 cm from the right hand.
- Pull backwards with your body weight.
- Pull the pole towards your body (fixpoint between the hands!), bending both legs (in fact, it is the boat that travels forward!) Pull the pole downwards.
- Raise the body.
- Turn your back to the direction of travel (fixpoint of the arms and hands), lift the left hand, place the palm holding the pole on top, bend the left leg, extend the right. (The boat is advancing again!)
- Change the weight onto the right bent leg, with the left leg extended.
- Leave the right hand, put it on top of the left, and move the weight backwards.
- Attack and push the pole forwards and downwards.
- Let go with the right hand, present it to the pole lower down, grip the pole, let go with the left hand, start to pull the pole out of the water, grip the pole with your left hand under the right hand again, lift the pole from the water, and turn the arms with the pole (fixpoint) into position 3.
Transformations of movement and transfers of the ferryman action. The following exercises can be applied for the learning and development of any action.
Exercise 3.240: Learn the movement by global reproduction.
Exercise 3.241: Learn the movement by breaking down the action into its main phases.
Exercise 3.242: Study the phases separately and connect them thereafter.
Exercise 3.230: Study the working energy and rhythm of resistance and free flow.
Exercise A. Breathe the movement: Inhale on raising movements, exhale on descending movements. Search for efficient breathing.
Exercise 3.244: Search for counter breathing.
Exercise 3.245: Transformation: Without a pole. Deform the space of the movement, enlarge the action to the limit of balance.
Exercise 3.246: Without a mimed pole. Deform the timing of the movement.
Exercise 3.247: Transformation: Reduce the action to work with a needle, and then to an absolute minimum (gestures). Nick.
Exercise 3.248: Recognise the inner conditions (emotions) for each sequence but maintain the changes in bodyweight!
Exercise 3.249: Transfer. Without the pole, do the movement attitudes (poses) for expressing an inner state.
Exercise 3.250: Without mimed pole. Adding steps and turns to each moment.
Exercise 3.251: Without mimed pole. Execution of the movement at a regular rhythm.
Exercise 3.252: Without mimed pole. Reduce the movement more and more, keeping the breathing.
Exercise 3.253: Do the movement while laughing.
Exercise 3.354: Do the movement expressing sorrow.
Exercise 3.255: Transfer: As an action.
Exercise 3.256: Transfer: As a description.
Exercise 3.257: Transfer: Use the physical action in another context.
Mimed work actions with objects
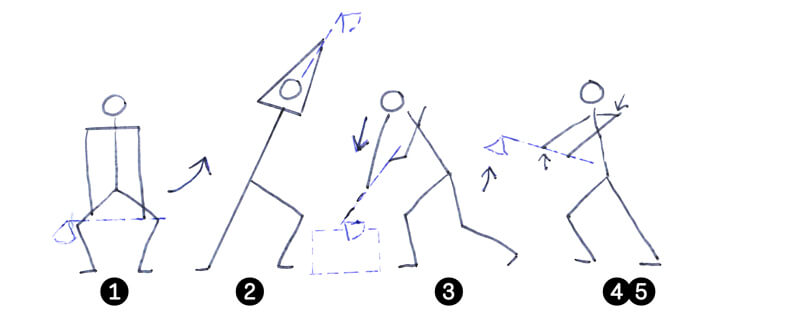
The digger exercises 3.258–3.265
Exercise 3.258:
- Start in the Eiffel Tower position, holding the shovel horizontally in front of the body.
- Lift the shovel with a high left elbow and force the blade in the ground (fixpoint between the hands).
- Lift the right foot and place it horizontally on the shovel.
- Push the foot down (put the body weight on it). There are two fixpoints: between the hands holding the shovel, and between the lower hand and the shovel.
- Lift the foot from the shovel, put it on the floor (with the shovel stuck in the earth).
- Pull on the shovel with the front hand, push with the back hand and lift the shovel almost horizontally.
- Rotate the body (weight on the bent left leg), with the shovel diagonally to the left as otkas.
- Move to the opposite side, right leg bent, and let the left hand glide towards the right (movement symbolising the earth falling from the moving shovel), and throw it a few metres away.
Regroup to the starting position.
Exercise 3.259: Walk 1–4 steps with each pose.
Exercise 3.260: Justify (psychologically) each pose at a very small scale.
Exercise 3.261: Do the action with a very small shovel or a needle (by action).
Exercise 3.261: Do the action as a very old man.
Exercise 3.263: Do the action without arms, or with only one arm.
Exercise 3.264: Indication of an emotion: unearth an idea.
Exercise 3.265: Change the rhythm of the action into a tango.
The wood cutter exercises 3.266–3.267
Exercise 3.266:
- Start in the samurai position, bend the body and grip the axe (1).
- With impulse, take a small step with the right leg, bend the body with elan to the right with the right leg bent, and the axe lifted over the head.
- ‘Throw’ or chop the axe with force into the log, starting with the knee, then the body to the left side (to the stake with the log, and fend it)
+. attack with left knee and neck (+). - The lower left hand pulls down and the right hand lifts a little (as lever, fixpoint of the hands.
- The axe comes loose from the log.
Exercise 3.267: Each pose is enlarged to demonstrate extreme balance and/or add steps.
The mower exercise 3.268
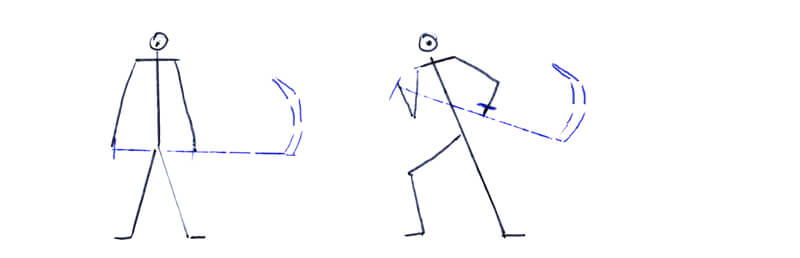
Exercise 3.268:
Start in the Eiffel Tower position, holding the scythe parallel in front of the body.
- Right steps forward, right, left.
- Left step forward, swing the scythe backwards.
- Hit the scythe diagonally forward to the left and cut the grass.